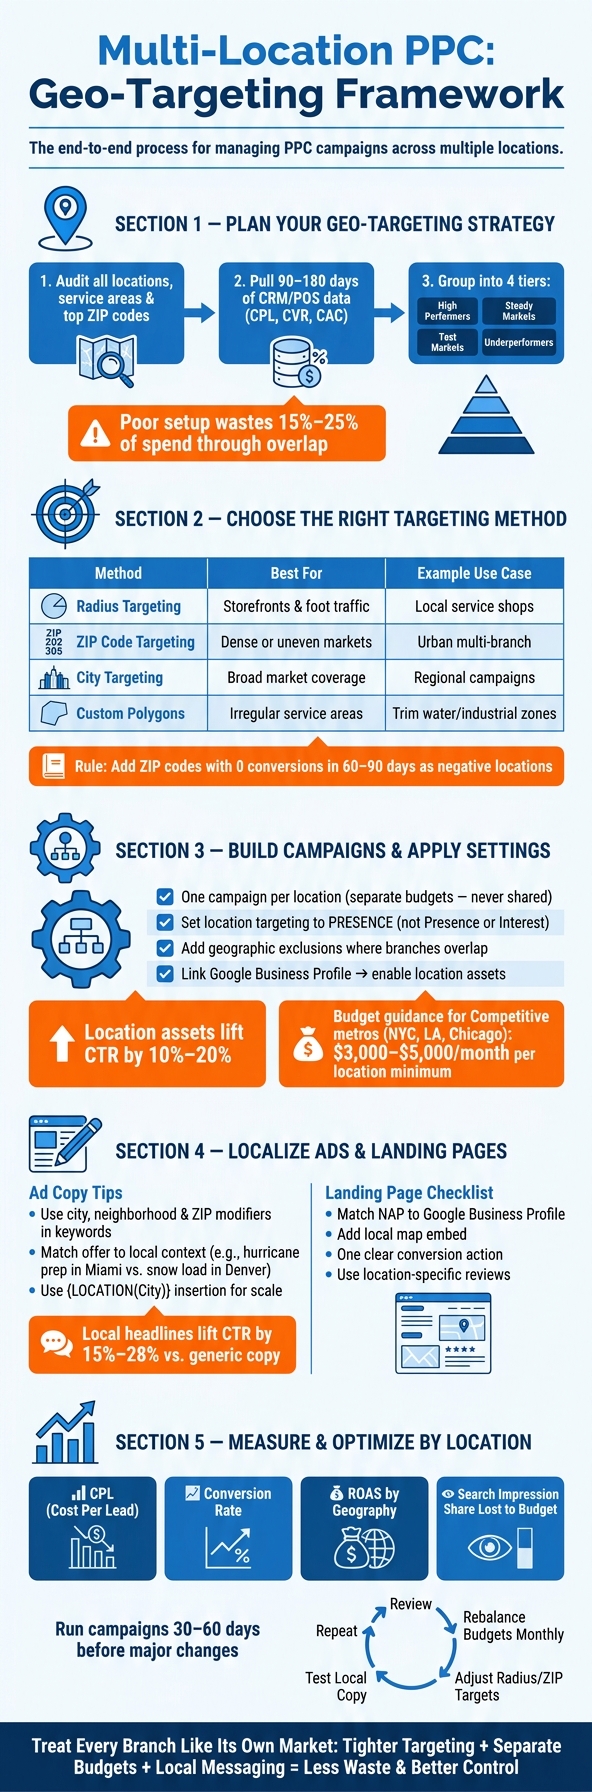
If you run PPC for more than one location, one big campaign usually wastes money. I’d split campaigns by location, use tight geo-targeting, block overlap, and track leads by branch so each market gets its own budget and its own results.
Here’s the short version:
A few numbers stand out. Poor setup can waste 15% to 25% of spend through overlap. Location assets can lift click-through rate by 10% to 20%. And local headlines often lift click-through rate by 15% to 28%.
My take is simple: treat each branch like its own market. Tighter targeting, separate budgets, and location-level reporting usually lead to less waste and better control.
Multi-Location PPC Setup: Step-by-Step Geo-Targeting Framework
Use the location map from the introduction to decide where each campaign should spend – and where it should not. This data-driven approach is a core part of effective content marketing services for local businesses. The first step is simple: build a master list for every location with its address, service area, and top ZIP codes. That gives you a clear view of coverage gaps and spots where campaigns overlap and compete for the same searches.
Next, pull at least 90 to 180 days of past data from your CRM or POS system. From there, calculate cost per lead (CPL), conversion rate, and customer acquisition cost (CAC) for each location. This is where the picture starts to sharpen. Some markets look busy on the surface but don’t turn into customers. Others may have fewer clicks but stronger return.
Use the User locations report to see where converting customers are located – not just where they showed interest.
Once the numbers are in place, group locations into performance tiers:
Those tiers should guide budgets, exclusions, and bid priorities.
Match the targeting method to the market shape. Use ZIP codes in dense markets, radius targeting in more spread-out areas, and custom polygons for irregular service areas.
Custom polygons take more setup time, but they can save a lot of wasted spend. If a service area isn’t a neat circle, polygons let you trim the map with more control. You can cut out bodies of water, industrial parks, or ZIP codes that keep bringing clicks but no conversions.
Any ZIP code with zero conversions over a 60–90 day window should be added as a negative location.
Set budgets with a scoring model that weighs revenue potential, local conversion rate, and lower local competition for each market. That helps keep money tied to opportunity instead of gut feel.
In practice, the split should look like this: high performers get aggressive budgets, steady performers get maintenance budgets, and test markets get limited budgets with clear KPIs until they reach at least 30–50 conversions in a 90-day window.
Each location also needs enough budget to produce usable conversion data. Without that, you’re judging markets before they have a fair shot. In competitive metros like New York, Los Angeles, or Chicago, that can mean $3,000–$5,000/month per location just to stay visible.
Use campaign-level budgets every time – not shared budgets. Shared budgets let Google push spend toward the cheapest clicks, and cheap clicks often aren’t the ones that bring profit. Those location tiers should connect straight into campaign structure and location settings.

Once budgets are set by location, structure campaigns so each market stays separate in both reporting and spend. That makes it much easier to see what’s working, where money is going, and which locations need help.
For most multi-location businesses, one campaign per location is the best setup. You get clean budget control, cleaner reporting, and fewer gray areas when performance shifts from one market to another.
That said, managing a large number of campaigns can get messy fast. If that starts to happen, grouping locations by region or market cluster is a solid middle ground. This works best when those locations have similar demand and similar performance.
Set location targeting to Presence. That keeps spend focused on people who are physically in the target area, not people who are just looking it up.
Choose targeting based on how the market looks on the ground:
When target areas overlap, add geographic exclusions. If two locations are close to each other, exclusions help draw a cleaner line between them and cut wasted spend between branches.
After you have enough conversion data, increase bids in ZIP codes that perform well and decrease bids in areas that bring clicks but no leads.
If your business covers more than one region, adjust ad schedules to fit local business hours and peak search times in each time zone.
Once each campaign is split by geography, tailor the keywords, ad copy, and landing pages to match that location.
Accurate location assets back up the same local signal your geo-targeting is already sending. Link your Google Business Profile to Google Ads, then turn on location assets at the campaign level so each location shows the right address, phone number, and map pin.
These assets often improve click-through rates by 10% to 20% compared with standard text ads.
Make sure your NAP data stays consistent across Google Business Profile, Google Ads, and landing pages.
Once campaigns are split by geography, the next step is simple: make the keyword, ad, and landing page point to the same place.
Use city, neighborhood, and ZIP modifiers to line up with how people search in each market. Set up one shared negative list for other location names, then leave each campaign’s own city name active. That helps stop cross-location bleed, where one location starts pulling searches meant for another.
That same location signal should show up in the ad copy too.
Local headlines often beat generic copy because they line up with what the searcher wants. And this goes beyond dropping in a city name. The offer itself should fit the market.
A roofing company in Miami should talk about hurricane prep and heat resistance. The same company in Denver should lean into snow load capacity and hail damage protection.
If you’re working across a lot of locations, Google’s location insertion feature ({LOCATION(City)}) can help scale local headlines. Using location-specific headlines usually lifts click-through rates by 15% to 28% compared with generic ad copy.
Keep the same local promise from the ad on the landing page. Send traffic to a dedicated location page that matches the ad and the search term.
A few details matter here:
If you’re managing dozens of locations, a template-based setup can work well. But the page text still needs to be different on each page. Duplicate copy across location pages can cause ranking issues and weaken performance. Each location page should feel tied to that place, not copied and pasted from somewhere else.
Once your campaigns, ads, and landing pages are localized, the next step is simple: find out which locations are bringing in profitable leads.
Treat each branch as its own market. That makes it much easier to compare performance by area, budget, and team. In Google Ads, set up separate conversion actions for each branch, such as "Lead Form – Phoenix" and "Lead Form – Dallas," so each lead is tied back to the location that produced it.
For phone calls, use call tracking with dynamic number insertion (DNI) so each location gets its own tracking number. It also helps to track other local actions, like "Get Directions" clicks, "Call" button taps, and store visit conversions.
You should also tag URLs with UTM parameters that include a location label, like utm_content=phoenix_north. That way, you can connect on-site behavior to a specific market inside Google Analytics.
Location-level ROI is the target. Before you move budget around, prove return for each branch.
Once those location-based conversion tags are in place, you can compare cost and revenue across markets with much more confidence.
Start with CPL and conversion rate. Those are usually the first numbers to check when you’re judging whether a market is profitable. If you’re also reporting ROAS by geography, factor in sales lag, because the gap between lead and closed sale can differ from one region to another.
Then look at Search Impression Share Lost to Budget for your top locations. If a market converts well but is missing impressions because the budget runs out, that’s a strong sign that more spend should go there.
In dense urban areas where several branches sit close together, ZIP code targeting can cut down on cannibalization. Without it, nearby locations may end up bidding against each other and driving CPCs higher.
Let campaigns run for 30 to 60 days before making major changes. That gives you enough data to compare locations on a fair basis. After that, group locations into tiers:
Rebalance budgets monthly, not quarterly. Demand can shift fast with the seasons, and equal budget splits often miss local peaks and slowdowns.
Reallocate budget by performance, not equal splits.
Keep testing local ad copy and landing page versions by market. If conversion reports show overlap, update your exclusions. If conversions are coming from farther out – or from a tighter area than expected – adjust your radius targets to match.
Use the next budget review to move spend toward the locations doing the best work.
Once you’ve tested each market, the next move is simple: keep your targeting, budgets, and reporting lined up by location. Multi-location PPC tends to work best when every location is treated like its own market.
The core steps aren’t complicated. Use the right geo-targeting method for each market, keep budgets and reporting separate, localize your ads and landing pages, and check performance by location.
Where do the biggest wins usually come from? Tighter geo-targeting, separate budgets, local messaging, and steady location-level optimization.
For most businesses, separate campaigns for each location work best. They give you independent budget control, more precise geo-targeting, and ad copy that fits each local market.
There’s no fixed number. But this setup tends to make the most sense as you grow.
With fewer than 10 locations, manual management can work well. Once you get past 8 to 10 locations, handling budgets and bids by hand gets harder. At that point, regional clustering or AI-driven tools may be a better fit.
Choose the method that fits your business model and service area:
No matter which option you choose, use Presence targeting to reach local customers.
Prevent overlap by setting up separate campaigns for each branch or geographic cluster. Then use tight geo-targeting, like specific ZIP codes or small radius settings, so each campaign covers its own area.
It also helps to use negative location targeting to block nearby branches’ areas. And set targeting to Presence so your ads show to people who are physically in each service area.


 Physical Therapy
 MedSpa
 Dental
 HVAC
HVAC Roofing
 Pest Control
 Cleaning Services
 Landscaping
 Hotel
Hotel Cruise
 Branding
 Content Marketing
 Email Marketing
 Graphic Design
 PPC (Online Ads)
 SEO (Search Engine Optimization)
 Website Design and Development
 Pest Control